Psychomotor Skills Testing… Everything you’ve learned up to this point is now going to be put to the test. For some students (depending on state), you are either at the point that you will now complete your third rides (clinicals), or you’ve completed the course and now you’re ready to graduate.
This is an exciting time because now you get to take all the skills you’ve learned and actually put them to use. But this can also be very scary. For me, it was stressful because I was more worried about the written exam. It just depends on if you are a good test taker or if you’re better with hands on skills.
A year or so ago, National Registry wiped their hands of psychomotor testing for the EMT level. Now it is left up to each individual state to administer their own psychomotor testing at this level. They still administer psychomotor testing for the AEMT and Paramedic levels; therefore, it is up to the state that you are testing in as to how they test psychomotor skills. Today we will discuss the former NREMT skill sheets that most states are still using at the time of writing this blog. Let’s go over what skills are tested and some important take-aways from each station:
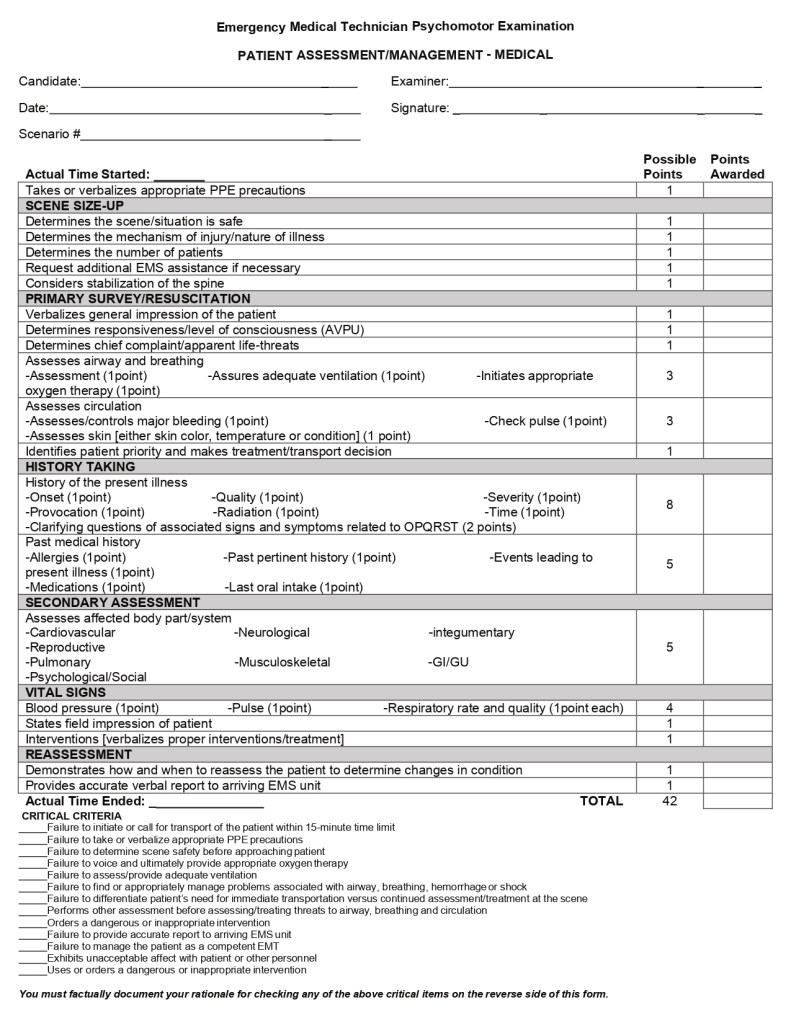
- Medical Assessment
- This is going to be a generic medical complaint that you will need to identify and treat. They are not crazy off the wall calls. For the most part, they are straight forward complaints that you will need to identify and treat with the correct medications and dosages. The big ticket item here is being a competent EMT. If you go into this skill looking like you know what you’re doing, more than likely you will pass with flying colors. Know your treatments, medication indications/contraindications, and dosages.
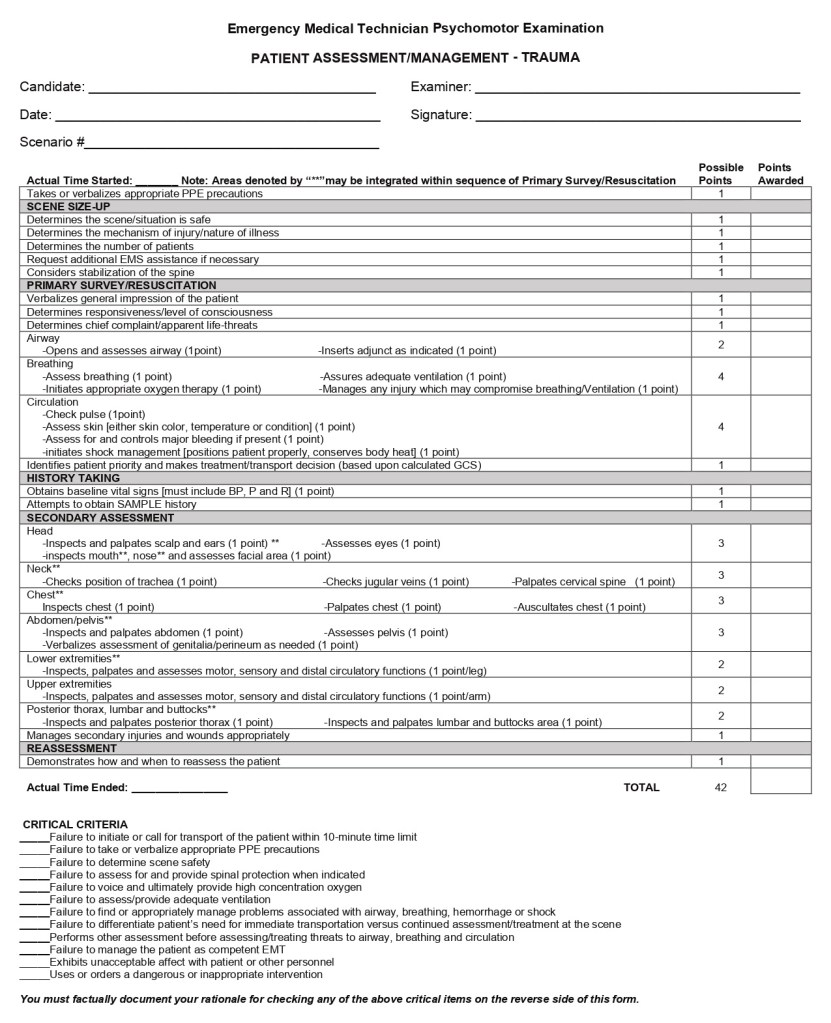
- Trauma Assessment
- This one is similar to your medical assessment, but obviously it’s a trauma call. They more than likely won’t be a multi-injury trauma incident. Make sure you splint/stabilize patients as needed and get them to the hospital. The big thing here is C-Spine. If there is ANY chance of spinal injury, then just take C-Spine precautions. You can’t lose points for taking C-Spine and back-boarding, so if you’re worried about it, then just do it.
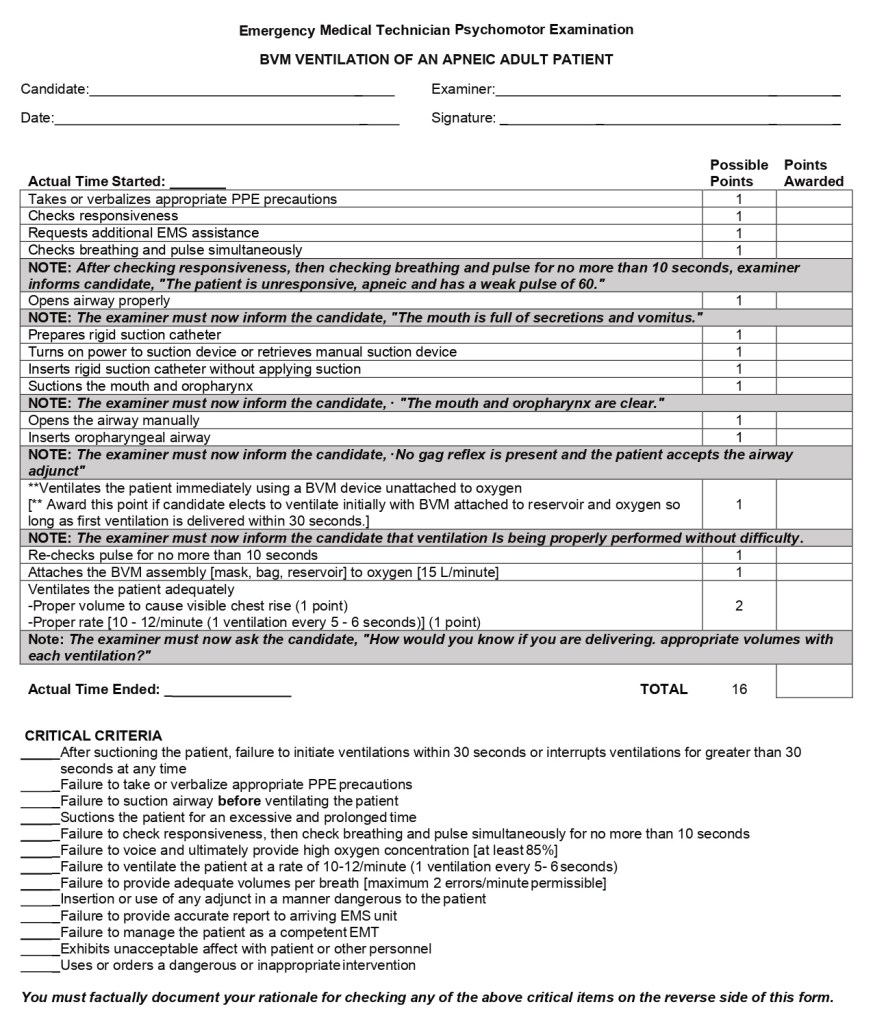
- Bag-Valve-Mask Ventilation of an Apneic Adult Patient
- This skill station you will be assessing a patient who has a pulse, but is apneic (not breathing). You will need to open the airway, suction, place an oral pharyngeal airway (OPA) and ventilate with a bag valve mask. Once you ventilate them, you will attach the BVM to oxygen. The big requirement for this skill is that the patient can’t go more than 30 seconds without ventilations after the airway has been suctioned. Once you’ve ventilated them and you are attempting to attach O2, if you have difficulty and are running a risk of going over that 30 seconds, you can always administer another breath to make sure you don’t go past 30 seconds. In my opinion, this is one of the easiest skill stations because it has a TON of prompts from the preceptor. If they don’t give you feedback, then more than likely you have skipped a step.
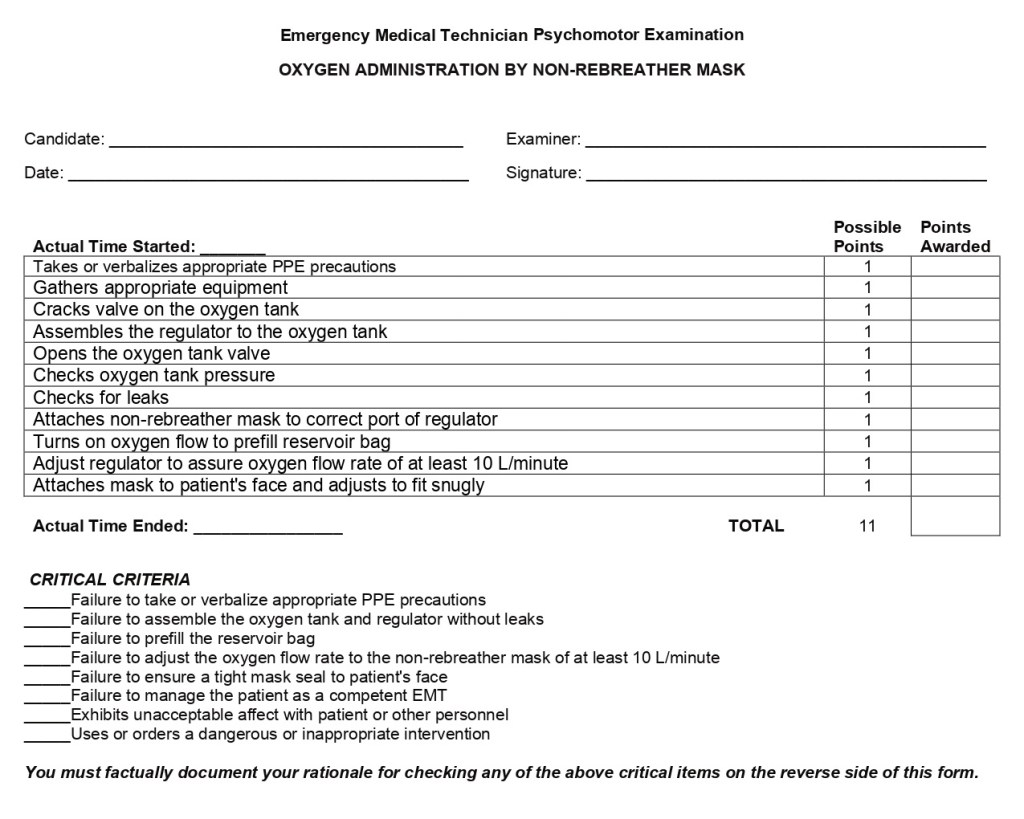
- Oxygen Administration by Non-Rebreather
- This skill station requires you to assemble an oxygen cylinder and regulator and then apply O2 via a non-rebreather mask (NRB). Before you attach the regulator, make sure that you “clear the line” by cracking the valve to push out any particles that may be in the port. The biggest critical failure here is making sure that you don’t have any leaks. Make sure that if the regulator doesn’t have a built in O-ring, that you use one, otherwise you will have a leak. If the regulator doesn’t sit at a 90 degree angle from the cylinder, then it isn’t on correctly.
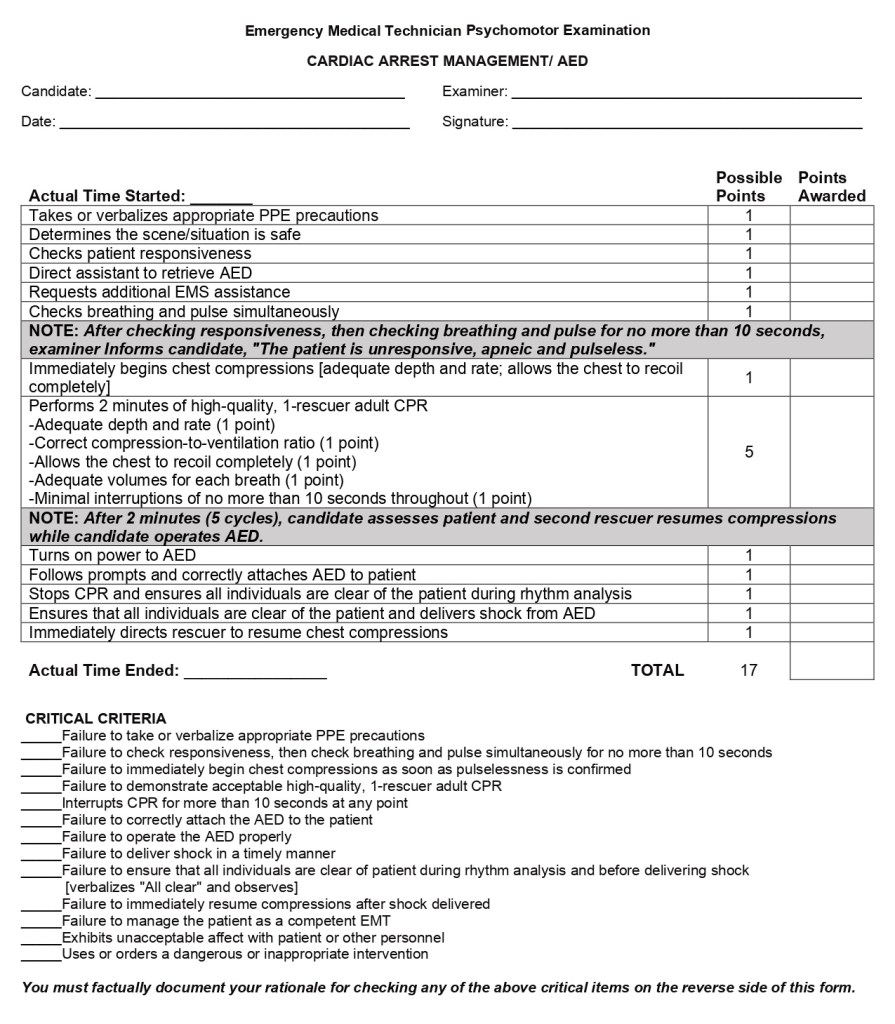
- Cardiac Arrest Management /AED
- This skill follows the current American Heart Association’s Basic Life Support CPR station. As soon as this skill starts, check for a pulse and if they are pulseless, then start CPR at a ratio of 30 compressions to two respirations and call for help (and an AED). Once you have completed a cycle of CPR, your “partner” will arrive with the AED and resume compressions. The biggest failure I see with this skill station is not turning on the AED prior to attaching the pads. Make sure that you turn the AED on and follow its commands. Failure to do so will trigger a critical fail. So make sure that you turn the AED on prior to applying the pads and plugging in the connector. Also, make sure that following analysis phase (when the AED says charging) that you resume compressions. Some AEDs will instruct you to stay clear of the patient, but this instruction is for the non-medically trained person, you only want to pause compressions when it is analyzing or delivering a shock. Speaking of shock, make sure you always clear the patient and others from the patient prior to delivering any defibrillation.
One Random Skill Check; including:
For these skills, one will be selected at random for the day of testing. All of the students in attendance will be tested on this same skill. These skills include:
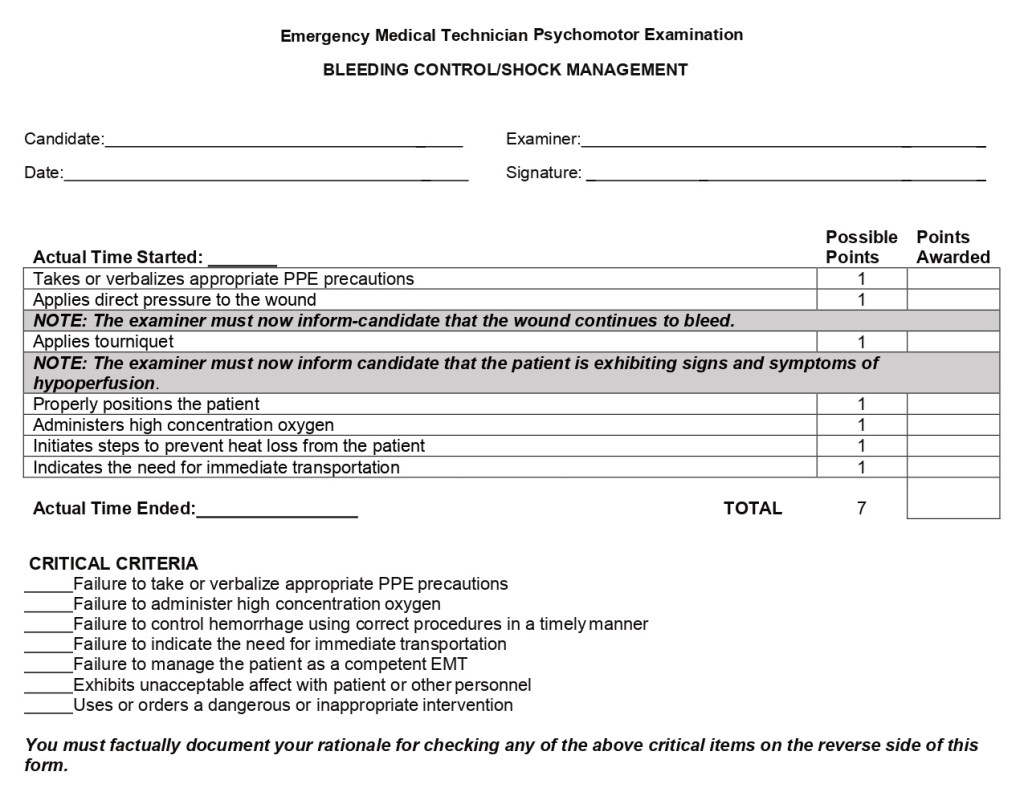
- Bleeding Control/Shock Management
- This one is pretty straight forward and can summarized into: direct pressure, tourniquet, treat for shock, and transport. When it comes to treating for shock, make sure you apply high flow O2, prevent heat loss and transport immediately.
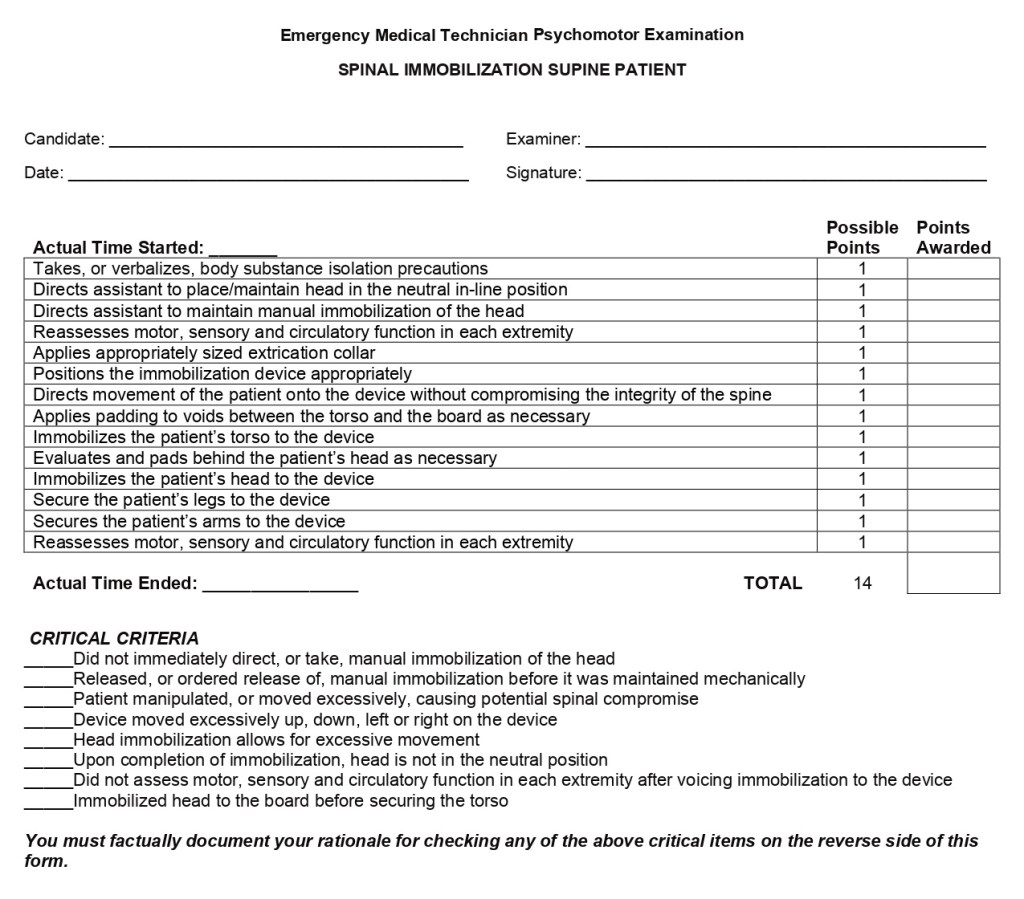
- Spinal Immobilization – Supine
- This skill is pretty straight forward as well; you will place a patient on a backboard. Make sure you take C-Spine precautions as soon as you ensure scene safety and PPE. Make sure that your “partner” maintains manual C-Spine until the head has been secured to the spinal board (which should be the LAST thing secured). Make sure you also utilize the “Z Method” of moving the patient up or down on the board to minimize movement and pad any voids if needed. You also want to assess for pulse, motor and sensory (PMS)/Circulation and motor and sensory (CMS) throughout the treatment. If you don’t ensure this before and after placing them on the board, it is a critical fail.
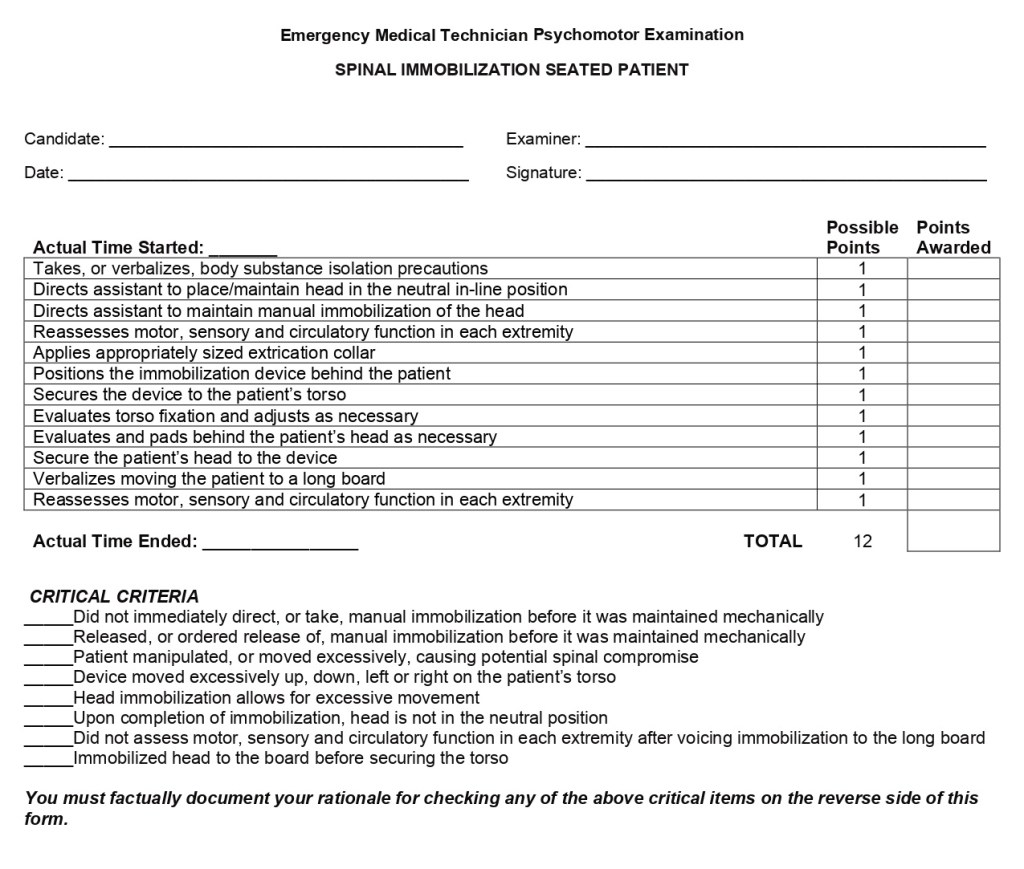
- Spinal Immobilization – Seated
- This skill is nearly a direct “copy and paste” of the supine immobilization; however, you are using a Kendrick Extrication Device (KED) and the patient is sitting up. This station used to require the straps to be secured in a certain order; however, this is no longer the case, as long as the head straps are the last to be secured. As with supine immobilization, make sure that your “partner” does not release C-Spine until the head has been secured. When placing the KED, you want to make sure the device is lifted into the axilla (armpit) as much as possible to avoid any excessive movement. Also, you want to make sure that all of the straps are snug and as always check PMS/CMS before and after the skill.

- Long Bone Immobilization or Joint Immobilization
- These skill stations are two different skills; however, they are nearly identical. A long bone could be either a femur fracture or humerus fracture and a joint can be either the knee or the elbow. This is left up to the testing site to choose which random skill station you’ll be tested on, as well as what kind of injury you will be treating. Same as before, you want to check PMS/CMS before and after the skill station to ensure that they remain intact. When splinting, you want to splint against any movement, so it is important that you immobilize above and below the joints and above and below the injury. One of the easiest parts to skip with this skill station is to immobilize the hand/foot “in the position of function”. For a hand, this means giving them a rolled package of gauze (or something similar in size) to hold in a neutral position. For the foot, have the foot facing its normal orientation (if possible) and not flexed outward/inward. If your patient has a possible fracture to their leg, you only apply a traction splint to a MID-LINE FEMUR fracture, again that’s a MID-LINE FEMUR fracture!
For more information and examples of these skills stations, I recommend watching the video series by EMTprep on YouTube. Contact your state EMS office for copies of the skill sheets they use for testing. Here is a list of the skills sheets that we have discussed today: https://emtprep.com/extra/nremt-exams/nremt-practical-exam-skill-sheets
If you have any questions about these skills stations, or need further explanation, please reach out to me using the “Contact Us” page of this site.
